Felting
The art of wet felting
I thought I would give this a go. I haven't had a chance to play with felt or my felting tools since I was taught in college a few years ago. I won a framed felted picture that a local lady had donated to a local charity raffle just before Christmas.
I think I was so pleased with it, the artist gave me a matching image for my birthday when she popped in to drop a sewing machine off for repair.
Anyway, she has inspired me to have another go and I have decided to run a session for a local Home Ed class.
It is a simplistic form of weaving, where the fibres are laid in a warp and weft (up and down, left and right) way.
You will need
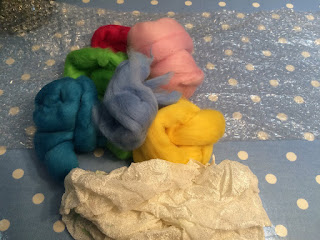
a variety in colours of wool
bubble wrap to cover the image area, front and back
olive soap
warm-hot water (as hot as you can comfortably cope with)
and an empty, clean spray bottle or small watering can
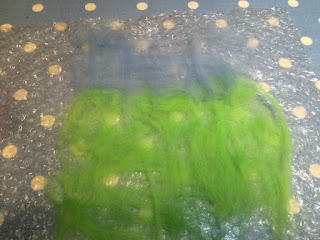
Lay the wool out - pulling thin amounts from the balls, onto the bubble wrap along, horizontally. (bubbles of the wrap facing up, or bumpy side up)

Then, add another layer onto of the first, vertically.


After a good poke around, I form a clear image onto the landscape.

This is what it looks like on the back.

done...

I will trim this down and sew it onto a bag, cushion or simply put into a frame.
Have fun, and share your projects with me at Abi's Den on Facebook x
(Oh and here's my Van Gogh)


I thought I would give this a go. I haven't had a chance to play with felt or my felting tools since I was taught in college a few years ago. I won a framed felted picture that a local lady had donated to a local charity raffle just before Christmas.
I think I was so pleased with it, the artist gave me a matching image for my birthday when she popped in to drop a sewing machine off for repair.
Anyway, she has inspired me to have another go and I have decided to run a session for a local Home Ed class.
It is a simplistic form of weaving, where the fibres are laid in a warp and weft (up and down, left and right) way.
You will need
a variety in colours of wool
bubble wrap to cover the image area, front and back
olive soap
warm-hot water (as hot as you can comfortably cope with)
and an empty, clean spray bottle or small watering can

Lay the wool out - pulling thin amounts from the balls, onto the bubble wrap along, horizontally. (bubbles of the wrap facing up, or bumpy side up)

Then, add another layer onto of the first, vertically.

Repeat this process, for another 6 or so layers. Keep the layers of wool thin with more layers rather than thick layers of wool but less number of layers.
You can see, I have added some white for clouds on the blue sky

...And some tinges of darker blue on the horizon and some yellow interspersed with the green for a floral aspect

Right, once I am happy with the amount of layers and the colour selection, I add a little amount of hot water to the the wool, really, I should sprinkle with a small watering can, or maybe a spray bottle, but alas, it was a spur of the moment project and I am left to sprinkle from a warm kettle.

Rub the damp bar of soap onto the bubble side of the top bubble wrap then gently place onto the wool. (Soap down onto the wool)
This is the olive soap I've used, bought from a local Turkish grocer.

Now gently massage, without too much movement, across and then circles... trying so hard not to move the wool, particularly the colours about.

You will feel the water disperse, gently push it around, and add more if you need to, to get the wool really wet. Gently lift the top bubble wrap away to do this. You can rub more soap onto the bubble wrap at the same time.
Keep at it, and go faster as you see the wool becomes fixed to the fibres around them and the image starts to set. Adding more soap and more hot water as you need to. Mop away any excess water to avoid a flood.
The heat, wetness and friction combined help fix the wool together to form the felt, the more you work at it, the better the fix and the better the quality of the felt.

I removed the felted image after about 15-20 minutes of massaging and rubbing, and washed it in clean hot water under the tap. Rubbing and scrunching the picture as I wash. You can go back and rub more soap and water into the felt if you feel the quality of the felt is not quite right.
Once I've allowed the washed felt to dry, I decided to add some darker green to the landscape, and a flower into forefront . I use a stencil for the flower, and pierce the wool through using a felting needle.
WATCH OUT - these needles are sharp, and they break easily...
You must also use a mat (I have a brush mat for my needle felting, but often foam is used)

So here, I push the wool into the stencil using only the needle.

After a good poke around, I form a clear image onto the landscape.

This is what it looks like on the back.

done...

I will trim this down and sew it onto a bag, cushion or simply put into a frame.
Have fun, and share your projects with me at Abi's Den on Facebook x
(Oh and here's my Van Gogh)


Comments
Post a Comment